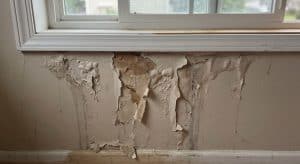
Ignoring basement moisture problems is the single most expensive mistake you can make during a renovation. Every year, we tear out brand-new drywall and ruined flooring because a homeowner assumed a slightly damp concrete wall would dry out on its own. It never does. Trapped behind insulation and a vapour barrier, even minor condensation quickly turns into black mold and rotted framing.
If you are planning a professional basement renovation in Ottawa, you must diagnose and eliminate every trace of water intrusion before buying a single sheet of drywall. The freeze-thaw cycles in our region put immense pressure on concrete foundations. Finding the exact source of the water is the only way to protect your investment.
The short answer: Repairing basement moisture problems costs between 400 CAD for a simple crack injection to over $15,000 for full exterior excavation. You must permanently stop hydrostatic pressure and seal the foundation before you begin framing, or your new renovation will fail within two years.
The Hidden Risks of Trapped Dampness
Concrete is porous. It acts like a rigid sponge, constantly wicking water from the surrounding soil through a process called capillary action. When you leave a basement unfinished, that moisture easily evaporates into the open air. You might barely notice it.
Once you frame, insulate, and seal those walls, that evaporation stops. The moisture is now trapped inside your wall cavity. Fiberglass insulation absorbs the water, losing its thermal resistance and sagging to the bottom of the stud bay. Within weeks, mold spores begin colonizing the damp wood and paper drywall backing.
Many homeowners try to solve basement moisture problems by painting the concrete with hydraulic waterproof paint. This is a temporary band-aid. The hydrostatic pressure—the weight of the groundwater pushing against your foundation—will eventually blister the paint right off the wall. You cannot stop water from the inside with a thin coat of paint; you have to manage the water pressure itself.
How to Diagnose Basement Moisture Problems
Before you hire a contractor, you need to know exactly what kind of water issue you are fighting. Finding the source dictates the repair method.
The Foil Tape Diagnostic Test
You can determine if your dampness is coming from the surrounding soil or from high indoor humidity using a simple test. Cut a 12-by-12-inch square of aluminum foil. Tape all four edges tightly to the bare concrete wall using heavy-duty duct tape. Wait 48 hours and peel it back.
- Moisture on the room side: You have high indoor ambient humidity. You need better ventilation and a dehumidifier.
- Moisture on the wall side: Water is pushing through the concrete foundation. You have active basement moisture problems requiring structural repair.
Visual Signs of Foundation Failure
On most Ottawa jobs we see, water leaves a distinct trail. Look for these specific indicators before you begin framing:
- Efflorescence: A white, chalky powder on the concrete. These are alkaline salts left behind when water pushes through the porous concrete and evaporates.
- Rust on appliances: Check the bottom casing of your furnace or hot water tank for premature rusting.
- Spalling concrete: Flaking or crumbling areas on the foundation wall indicate severe freeze-thaw damage.
- Dark stains at the cove joint: The cold joint where the floor slab meets the foundation wall is the most common entry point for hydrostatic pressure.
Common Causes of Basement Moisture Problems in Ottawa
The local climate and soil conditions in the National Capital Region create unique challenges for residential foundations. Understanding what is attacking your home helps you choose the right defense.
Hydrostatic Pressure and Soil Types
When the ground surrounding your home becomes saturated from spring snowmelt or heavy rainfall, the water table rises. This water weighs approximately 60 pounds per cubic foot. It presses relentlessly against your foundation walls and beneath your concrete slab. If the pressure finds a hairline crack or a porous cold joint, water will force its way inside.
Different neighbourhoods face different geological challenges. In Barrhaven, the heavy Leda clay expands when wet and shrinks when dry, acting like a hydraulic press against your foundation. In Kanata, shallow bedrock often traps water against the house rather than letting it drain away naturally. Both scenarios cause severe basement moisture problems Ottawa homeowners must address prior to finishing.
Poor Exterior Grading
Your yard should act as a natural shield. The ground must slope away from your foundation at a minimum grade of 5% for the first 2 metres. Over time, the backfill soil around a house settles, creating a negative grade. Water from your roof and lawn funnels directly against the concrete rather than draining into the yard.
Failing Eavestroughs and Downspouts
A standard residential roof sheds thousands of gallons of water during a heavy summer storm. If your gutters are clogged, or if your downspouts discharge only a foot away from the foundation, you are dumping all that water directly onto your weeping tile system. Downspouts must extend a minimum of 6 to 10 feet away from the foundation walls to effectively prevent localized flooding.
Not sure which applies to your home? Alba offers free assessments in Ottawa — 613-831-9802.
Fixing Basement Moisture Problems from the Outside
The most effective way to keep a basement dry is to stop the water before it ever touches your concrete wall. Exterior waterproofing is invasive and expensive, but it is the ultimate permanent solution.
Full Exterior Excavation
This process involves digging a trench down to the foundation footing along the affected exterior walls. The process is highly technical:
- Excavation and Cleaning: A mini-excavator digs down to the footing. The concrete wall is pressure-washed and allowed to dry.
- Crack Repair and Parging: Any visible cracks are chiseled out and filled with hydraulic cement. A parge coat is applied to smooth the surface.
- Elastomeric Membrane: A thick, rubberized asphalt membrane is rolled or sprayed onto the wall. Unlike tar, this membrane remains flexible and stretches if the foundation settles.
- Dimple Board Installation: A high-density polyethylene dimple sheet (like Platon) is fastened over the membrane. This creates an air gap, allowing water to drop directly down to the drainage tile.
- New Weeping Tile: The old, crushed clay or plastic weeping tile is removed. A new perforated pipe, wrapped in a protective filter sock, is laid alongside the footing in a bed of washed river stone.
- Backfill: The trench is carefully backfilled and properly graded.
Because exterior excavation destroys landscaping, driveways, and decks, it is not always feasible. In tight urban lots, digging may not be legally permitted if it encroaches on property lines. Always consult the City of Ottawa drainage bylaws before planning exterior excavation.
Fixing Basement Moisture Problems from the Inside
When exterior excavation is impossible or cost-prohibitive, you must manage the water from the inside. Interior systems do not stop water from penetrating the concrete, but they capture and eject it before it can damage your living space.
Polyurethane Crack Injection
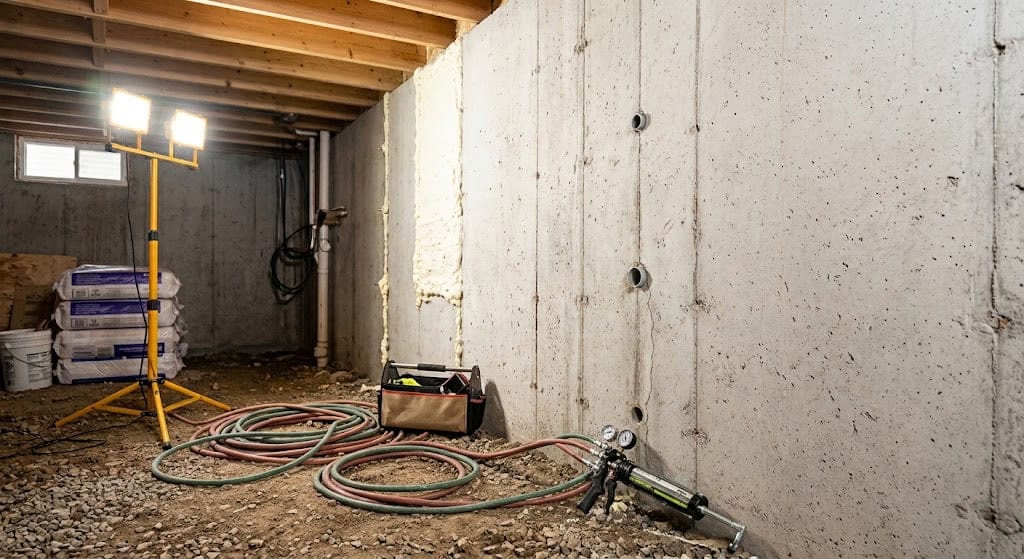
If you only have one or two vertical shrinkage cracks, they can be sealed from the inside. We use a low-pressure polyurethane injection system. Polyurethane is vastly superior to epoxy for residential basements because it expands up to 20 times its volume, filling the entire depth of the crack to the outside soil. More importantly, it cures flexibly, allowing it to move with the natural expansion and contraction of the concrete during Ottawa winters.
Interior Weeping Tile Systems (French Drains)
For widespread seepage, an interior drainage system is required. This involves jackhammering a 12-to-18-inch trench in the concrete floor around the perimeter of the basement.
- A perforated drain pipe is laid in the trench and surrounded by clear gravel.
- Weep holes are drilled into the bottom course of concrete blocks (if you have a cinder block foundation) to drain trapped water from the cores.
- A dimple board is run down the interior wall and tucked into the trench. Any water that penetrates the wall hits the board, drops into the trench, and flows to a sump basin.
- New concrete is poured over the trench flush with the existing floor.
If you are already trenching the floor for an interior weeping tile, it is the most cost-effective time to rough-in your plumbing. If you are planning a basement bathroom addition, coordinate these two concrete-breaking tasks to save thousands on labour.
Sump Pumps and Battery Backups
An interior weeping tile is useless without a reliable way to eject the water. The system drains into a sump pit housing a submersible pump. A common mistake homeowners make is relying entirely on a single pump plugged into the grid. During a severe thunderstorm, the power often goes out right when you need the pump the most.
You must install a battery backup system. This involves a secondary 12V DC pump mounted slightly above the primary AC pump, powered by a marine deep-cycle battery. If the main pump fails or the power drops, the backup automatically engages, saving your finished basement from catastrophic flooding. If a flood has already occurred, you must bring in emergency restoration teams to dry the framing before mold sets in.
Managing Condensation and Humidity
Sometimes, basement moisture problems are entirely airborne. Even with perfectly sealed concrete, the basement is naturally the coolest part of the house. When warm, humid summer air travels downstairs and hits the cool foundation walls, condensation forms.
Proper Vapour Barriers and Insulation
When finishing the space, managing this temperature differential is critical. We strongly recommend closed-cell spray foam insulation against the bare foundation walls. Closed-cell foam acts as both a superior thermal insulator and a continuous vapour barrier. It prevents warm interior air from ever touching the cold concrete, entirely eliminating the risk of interstitial condensation.
Dedicated Dehumidification
Do not rely on a cheap, portable dehumidifier you have to empty by hand. For a finished space, install a high-capacity, whole-basement dehumidifier tied directly into your HVAC ductwork or plumbed straight into a floor drain. Set it to maintain a relative humidity between 30% and 50% year-round. This is explicitly recommended by CMHC moisture control guidelines to prevent mold growth in Canadian basements.
Legal Code and Egress Impact
If you are building a legal basement apartment, resolving moisture is not just a preference; it is a strict code requirement. The Ontario Building Code mandates specific damp-proofing and drainage standards for secondary dwelling units. Building inspectors will halt your project immediately if they spot active water intrusion, efflorescence, or unsealed foundation cracks during the framing inspection. Fix these issues first, secure your permits, and proceed with a dry, compliant space.
How Much Does It Cost to Fix Basement Moisture Problems?
Pricing varies wildly depending on the severity of the intrusion, the accessibility of your foundation, and linear footage. Below is a realistic look at what Ottawa homeowners can expect to pay in 2026 to resolve these issues.
| Repair Method | Low (CAD) | High (CAD) | Notes |
| Polyurethane Crack Injection | $400 | $800 | Price per crack. Highly effective for vertical shrinkage cracks. |
| Grading & Downspout Extension | $500 | $2,500 | Involves delivering topsoil, re-grading the slope, and burying extensions. |
| Sump Pump Installation | $1,200 | $3,500 | Higher end includes breaking the slab, the pit, a primary pump, and a battery backup. |
| Interior Weeping Tile System | $4,500 | $8,500 | Varies by linear footage. Requires jackhammering the perimeter floor. |
| Full Exterior Excavation | $12,000 | $25,000+ | Requires heavy machinery, membrane application, and landscape replacement. |
Investing $5,000 in an interior drainage system might feel painful, but it acts as an insurance policy for the $50,000 you are about to spend on drywall, custom cabinetry, and luxury vinyl plank flooring.
Frequently Asked Questions About Basement Moisture Problems
How do you tell if your basement has moisture problems?
Look for visual cues like white, chalky efflorescence on the concrete, dark stains near the floor joint, or rusting at the base of appliances. A persistent musty smell is a guaranteed indicator of hidden dampness. You can also tape a square of aluminum foil to the bare concrete; if water forms underneath the foil after 48 hours, water is penetrating the foundation.
Can you finish a basement that gets damp?
No, you should never finish a damp basement. Trapping moisture behind drywall and a vapour barrier will immediately trigger mold growth and rot the wood framing. You must completely resolve all leaks, manage the hydrostatic pressure, and install proper dehumidification before any finishing materials are installed.
Will painting the walls fix basement moisture problems?
No. Waterproof masonry paints and hydraulic cement coatings are cosmetic bandaids. They trap moisture inside the porous concrete block or poured wall. Eventually, the hydrostatic pressure from the groundwater will cause the paint to bubble, peel, and flake off. You must address the water at the source.
Does homeowner’s insurance cover basement leaks?
Generally, standard insurance policies cover sudden, accidental internal water damage (like a burst pipe). They rarely cover seepage caused by gradual foundation deterioration, poor grading, or hydrostatic pressure. You often need a specific overland water or sewer backup endorsement to be covered for external flooding.
How much does it cost to fix a wet basement in Ottawa?
Minor repairs like a single polyurethane crack injection cost between $400 and $800. An interior perimeter weeping tile system ranges from $4,500 to $8,500. Full exterior excavation and waterproofing is the most expensive, typically ranging from $12,000 to over $25,000 depending on linear footage and accessibility.
How long do foundation repairs last?
When executed correctly, professional foundation repairs are permanent. Polyurethane injections flex with the foundation and last for decades. Exterior elastomeric membranes combined with dimple boards typically carry 20-to-25-year warranties, effectively protecting the home for the lifespan of the current owner.
Secure Your Foundation Before You Build
The excitement of designing a home theatre or a new basement suite often causes homeowners to rush past the unglamorous preparation work. Do not make that mistake. Identifying and permanently repairing basement moisture problems is the essential first step of any successful renovation. A dry foundation ensures your framing remains solid, your air quality stays healthy, and your new finishes look flawless for decades.
Once your foundation is completely dry and sealed, you are ready to build. If you need help evaluating your concrete or want to move forward with expert basement finishing services, Alba is ready to help. Get a free consultation today—call 613-831-9802. Serving Ottawa and surrounding areas.